When we format a pc / laptop or
install windows OS, Linux OS we must need an installation media. In this case,
we used OS disk or Pendrive with OS installed.
In this article, you know about
what is the process of creating an installation media that you can use for
installing the OS in your Pc or Laptop
Many ways exist but we have
shared here the easiest way which you can easily understand.
FIRST METHOD
MAKE A BOOTABLE USB DRIVE USING RUFUS SOFTWARE
Before starting the tutorial, you
must know about what is Rufus
Rufus is a small application that
creates bootable USB drives, which can then be used to install or run Microsoft
Windows, Linux, or DOS. In just a few minutes
Rufus is a utility that helps
format and creates bootable USB flash drives, such as USB keys / Pendrives,
memory sticks, etc.
It can be especially useful for
cases where:
- you need to create USB installation media from bootable ISOs (Windows, Linux, UEFI, etc.)
- you need to work on a system that doesn't have an OS installed
- you need to flash a BIOS or other firmware from DOS
- you want to run a low-level utility
First, you need to download the
Rufus software we will provide the link for downloading the software
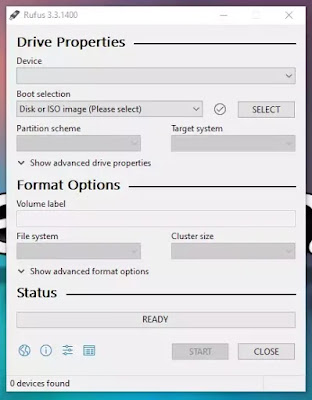
Then put your Pendrive on your pc
or laptop and then the software automatically detects the Pendrive. Then you
have chosen an operating system what do you want to install in your pc or
laptop.
Then you choose the BIOS or UEFI
interface. If you run your pc in BIOS interface then you choose BIOS option and
choose the file system MBR
Then do not change any other
filled direct click the start button, suddenly you have noticed that a pop-up
window appears in this window click the YES button. After that, the bootable
process is started.
During this process the Pendrive
is formatted and then the Windows Iso file starts copying from the Pendrive
automatically. When the process is complete it automatically detects a finish
notification then you have closed the application and your Pendrive is ready
for the booting process.
The complete process is taking
around 10 to 15 minutes it completely depends upon the laptop or Pendrive read
or write speed.
SECOND METHOD
MAKE A BOOTABLE USB DRIVE USING COMMAND PROMPT
Before starting the tutorial, you
must know about what is COMMAND PROMPT.
Command Prompt is a command-line
interpreter application available in most Windows operating systems. It's used
to execute entered commands. Most of those commands automate tasks via scripts
and batch files, perform advanced administrative functions, and troubleshoot or
solve certain kinds of Windows issues. Command Prompt is officially called
Windows Command Processor, but it's also sometimes referred to as the command
shell or CMD prompt, or even by its filename, cmd.exe.
How to Access Command Prompt
There are several ways to open
Command Prompt, but the "normal" method is via the Command Prompt
shortcut located in the Start menu or on the Apps screen, depending on your
version of Windows. The shortcut is faster for most people, but another way to
access Command Prompt is via the CMD Run command. You can also open cmd.exe
from its original location.
You can create a bootable USB
flash drive to use to deploy Windows Server Essentials. The first step is to
prepare the USB flash drive by using DiskPart.
To create a bootable USB flash drive
- Insert a USB flash drive into a running computer.
- Open a Command Prompt window as an administrator.
- Type diskpart.
- In the new command line window that opens, to determine the USB flash drive number or drive letter, at the command prompt, type list disk, and then click ENTER. The list disk command displays all the disks on the computer. Note the drive number or drive letter of the USB flash drive.
- At the command prompt, type select disk <X>, where X is the drive number or drive letter of the USB flash drive, and then click ENTER.
- Type clean, and then click ENTER. This command deletes all data from the USB flash drive.
- To create a new primary partition on the USB flash drive, type creates partition primary, and then click ENTER.
- To select the partition that you just created, type select partition 1, and then click ENTER.
- To format the partition, type format fs=ntfs quick, and then click ENTER.
- To format the partition, type format fs=ntfs quick, and then click ENTER.
NOTE: If your server
platform supports Unified Extensible Firmware Interface (UEFI), you should
format the USB flash drive as FAT32 rather than as NTFS. To format the
partition as FAT32, type format fs=fat32 quick, and then click ENTER.
- Type active, and then click ENTER.
- Type exit, and then click ENTER.
Then go to your Windows ISO files
open it and copy all the files then paste the files from the Pendrive. Wait for
the copying process complete.
Now the Pendrive is ready for
booting.


Post a Comment
Post a Comment
If You Have Any Doubts, Please Let Me Know