Chrome OS was released in 2011 and since then has seen steady improvement in the spectrum. While some are important for their viability in today's market, Chrome OS is doing very well in the US and mainly in the field of education. So if you already own one or want to buy a Chromebook, we have got some great features and recommendations for you. In this article, we have brought to you 27 best Chrome OS tips and tricks that are going to help you master this new operating system easily. We mentioned unique tricks for both beginners and advanced users, so the article has something for every set of users. Now saying all this, let us go without further lists.
Chrome OS
Tips and Tricks for Beginners
As
noted above, the article is classified into two sections: one for beginners and
the other for advanced users. Depending on your level of expertise, you can go
through the article and learn more about the Chromebook. In addition, I also
want to add that I have included all the new features and hidden settings that
are available on the Chrome OS 79 update. So without any delay, let's start
with Chrome OS tips and tricks.
Set a PIN
for a seamless login.
As
we already know, Chromebook is deeply connected to our Google account.
Therefore, before accessing anything, we have to enter our Google Account
password every time. I find it very tiring and frankly a chore. Coming from a
Windows PC, I'd like to set a PIN for hassle-free login and thankfully, now
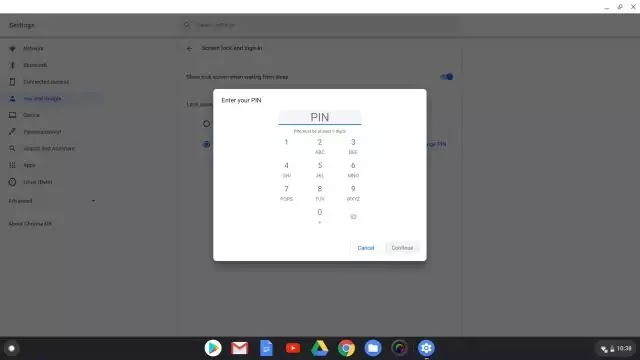
Google allows you to set a PIN. To create a PIN, open Settings (Cogwheel icon)
from the Quick Settings menu and "Screen lock and sign-in" under the
"You and Google" section. Here, enter your Google Account password
for the last time and set a 6 digit PIN. Voila, you're done.
Enable
offline mode.
You
can enable offline mode on Chromebooks for Google Docs and Drive. For Google
Docs, first install this extension and from here turn on the checkbox for
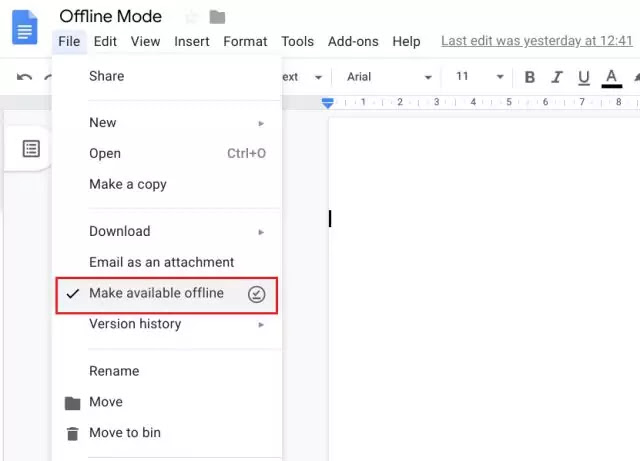
"offline" mode. You can also make a particular document offline by
going to the File menu and checking the "Make available offline"
option. However, be sure to modify all these settings while connected to the
Internet.
Master
search on Chromebook.
The best thing about Chromebooks is that Google is integrated into the search
system and the web. So, just press the dedicated search button on your keyboard
and start typing and hit enter. No need to open Chrome then open a new Chrome
tab and see things. No matter whether you are at the bottom of the settings
page or in Chrome itself - the search button always opens the result in a new
tab immediately. I'd say it's better than opening a tab via the Ctrl + T
shortcut. Apart from this, you can also search Chrome apps and settings through
the search button.
Google
Assistant.
You
can also get your stuff through Google Assistant, similarly, you can do it on
your smartphone. It works quite well and has no limitations compared to the
assistant on our Android smartphone. Just press the "Search" and
"A" keys on your keyboard simultaneously and Google Assistant will
pop-up, ready to listen to your commands. You can also trigger Google Assistant
via sound. Open Settings and click on "Search and Assistant" in the
left pane menu. Here, click on "Google Assistant" and enable the
toggle for "Ok Google".
Enable
Caps Lock.
I
know you don't have a dedicated caps lock button when you find out you don't
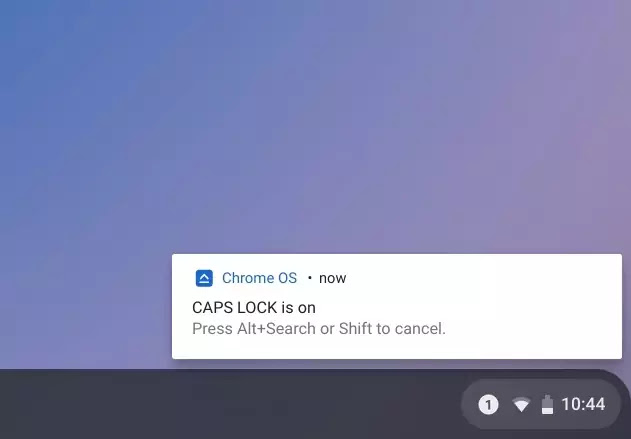
have a Chromebook. But don't worry, you can easily enable it by pressing the
"Search" and "Alt" keys at once. A notification will pop-up
that Caps Lock has been turned on until you turn Caps Lock off using the same
shortcut. I know it's not straightforward, but at least there is away.
Navigation gestures.
Unlike
Windows and macOS, you don't have many types of gestures on Chrome OS. However,
you can access the observation window with simple 3-finger slide up / down
gestures. Also, if you are in the Chrome browser, you can use the 3-finger
slide in the left and right directions to easily move between tabs. This is one
of the best gestures I find on Chrome OS and I use it regularly when
multi-tasking. Also, you can close a tab on the Chrome tab by tapping just 3
fingers at a time.
Preview
files quickly.
Sure,
the file manager on Chrome OS is not as great, but I love the fact that it is a
quick preview shortcut to any file we have on macOS. Simply select a file and
press the "space" key. Immediately, the file will be previewed in a
large window with all the details (file size, format, etc.) in the right pane.
In addition, you can switch between files while in preview mode and eject it by
pressing the "Esc" key. These are the little things that make us
happy to use Chrome OS.
Touchpad
scrolling.
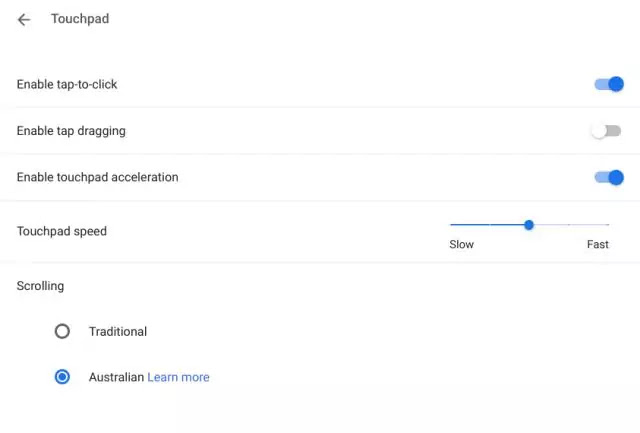
Many
people who are coming from Windows PC find the default scrolling behavior on Chrome
OS contrary and explicitly, it was quite annoying for me as well. However,
there is a way to change the scrolling behavior from the Settings page. Click
"Device" from the left menu and open "Mouse and Touchpad".
Here, scroll and change scrolling to "Australian", also known as
natural scrolling on macOS.
Virtual
Desktop.
Users
have been asking for a virtual desktop environment on Chrome OS for a long
time. Finally, it is available in a stable channel starting with Chrome OS 78.
For multi-taskers, this is a great help as it helps them to focus on the
important things first. So here's how you can access it. Just do a 3-finger
slide gesture and you will find the "New Desk" option on the
top-right corner. Alternatively, you can use these shortcuts: Shift + Search +
= Shift + Search + - to create a new virtual desktop to delete one. You can
switch between them using the search +] and search + [shortcuts.
Supporting shortcuts for Chrome OS.
While
there are infinite keyboard shortcuts on Chrome OS, here are some important
ones that will help you navigate through Chrome OS like a pro.
Search for
anything: press the search button
Trigger
Google Assistant: Search + A
Lock your
Chromebook: Search + L
Take a
screenshot: Ctrl + overview button (you'll find it just above the 6 key)
Delete: Alt +
Backspace
Snap
Windows left / right: Alt +] and Alt + [
Keyboard
Cheats:
Ctrl + Alt +?
Add a
secondary Google account inside the existing profile.
On
Windows, you can add multiple Google accounts under the same Chrome profile,
but on Chrome OS, Google creates a new profile for each new Google account.
While I get the idea behind it, sometimes I just want to check my work emails
or drive files from another Google account and when it gets frustrating.
Nevertheless, Google has now provided the option of adding a secondary account
itself to the existing profile. Here's how you can access it. Open Settings and
click on your name under the "You and Google" section. Here, click
"Add Account" and enter the new Google Account credential. Enjoy it!
Enable
Android Apps.
As
most of you know, Google has brought Android app support to the Chromebook and
is a great step towards creating a consistent Google ecosystem. You can install
and use millions of Android applications directly from the Google Play Store.
If it is not turned on by default, you can enable the Play Store from the
Settings page. Click the "Applications" on the left and open
"Google Play Store". Here, allow various permissions and set up the
Play Store. Just. Enjoy Android apps on your Chromebook.
If
the Play Store settings are not visible on your Chromebook, it may be in beta
and you may have to change your update channel to access the Play Store. I
mentioned how to change the update channel in the next section, so go through
those steps. In addition, you can find details about Play Store support for
your Chromebook from here.
Enable
floating keyboard.
If
you are using your Chromebook in tablet or tent mode, you can enable the
floating keyboard. This will help you use a touch-screen display. So to enable
it, open Settings and click "Advanced" from the left pane menu. Here,
scroll down and open "Accessibility". Now, just enable the toggle for
the
"on-screen"
keyboard. Now, a keyboard icon will appear on your shelf. Click on it and
voila, the keyboard is on your screen.
Share
your Chromebook.
As
we mentioned before the Chromebook is, in some sense, a very personal computer.
It's directly connected to your Google account, so allowing anyone to access
your Chromebook means they can see your photos, view your emails, read your
notes, among many other things. In a way, sharing your Chromebook with
Windows-based computers are not easy. So, if someone asks you to use your
Chromebook for a while, ask your sister or someone in your family? Okay, you
can create a separate account or better, take advantage of "guest
mode". This lets you access most Chrome OS features without adding any
accounts. Open the Quick Settings menu from the bottom-right corner and sign
out of your current profile. Now, click on "Guest Mode" at the bottom
and you will be in a temporary profile.
Reset
option in Chromebook.
If
you are having a problem with your Chrome OS, you can easily factory-reset your
machine (called Powerwash on Chrome OS), similar to an Android device. The
great thing about Chrome OS is that all your files are synced to Google Drive,
so you don't have to worry about data loss. Just open Settings and click
"Advanced" from the left pane menu and then go to "Reset
Settings". Here, click the "Reset" button and the computer will
restart to complete the process. After that, sign in with your Google account
and everything will fall into place as before.
Other
Chrome OS Tips.
If
you were reading something on your Android and suddenly moved to Chromebook
then you can easily continue reading it on your computer. Just press the
"Search" button once and you will find the link in the first entry.
Click on it and there you have it. Also, if you want to quickly call a phone
number from a webpage, you can right-click on it and send it to your Android
device. Your smartphone will prompt you with a one-tap call notification.
Chrome OS
Tips and Tricks for Advanced Users.
Connect
your Android device.
Google
has brought support for Android devices on a Chromebook that can help you do
many of the tasks originally done. If no WiFi is available, Google allows
Chromebooks to automatically organize your Android device for always-on data
connectivity. In addition, you can basically sign in to your Chromebook by
unlocking your Android device. Basically, both devices are always in
communication so that you get the best experience from Google. So if you want
to add your Android device, open Settings and click on "Connected
Device" in the left pane. Here, set up your Android device and you're good
to go.
Change
the update channel.
If
you are someone who wants to taste the new and exciting features of Chrome OS,
then you have to jump ship from Stable to another channel. In the update
section, there are 4 update modes: Stable, Developer, Beta, and Canary. I would
recommend you stick to the developer or beta channel as these are relatively
bug-free compared to Canary and allow you to enjoy the upcoming features. So to
change the update channel, open Settings -> Click "About Chrome
OS" in the left pane -> Change Channel. Here, select the update channel
of your choice then go back and check for updates. After downloading the update
and installation, just restart your Chromebook and you'll be inside.
Build
standalone apps from websites.
If
you want some websites to behave like an app with a separate window and
launcher menu then you can build such standalone apps on Chromebook. However,
keep in mind, this is only possible on websites that follow the PWA
(Progressive Web App) standard. For example, you can easily create apps from
the websites of Spotify, Twitter, and our own portal beebom.com. To do this,
open the website of your choice and click on the 3-dot menu at the top-right
corner. Here, open more tools -> Create Shortcut -> Check the box for
"Open as Window" and click on the "Create" button. Now, you
will get the website as a separate app available in your launcher and you can
also pin it on your shelf.
Run any
Android app.
While
Play Store support on Chromebooks is great, many users find it inadequate
because some of their favorite apps are not officially available on the Play
Store. In that case, you have to download the APK and run it through ARC
Welder. I have explained the steps in great detail in a separate article on how
to install the Kodi app on Chromebook. You can also follow similar steps to
install other applications.
Force
Android app to be re-enabled.
If
some Android app is not allowing you to resize its window size or open in
landscape orientation you can force it to enable the flag from the Android
Settings page. Open Chrome OS Settings and click on Apps in the left pane ->
Google Play Store -> Manage Android Preferences. Now we are on the Android
Settings page, so go to System -> About Device -> click "Build The number" continuously 7-8 times. Now, go back and open "Developer Options".
Scroll down to enable the toggle "Force movements to be resizable".
Finally, restart your Chromebook and Android apps should now be reusable.
Use
third-party DNS.
Like
Android smartphones, we can change the DNS configuration on the Chromebook as
well. You can use third-party DNS such as Cloudfare or OpenDNS to improve your
Internet speed. So to modify the DNS, open Settings and click on the WiFi
network to which you are connected. Here, scroll down and click
"Network" to expand the menu. Finally, select "Custom Name
Servers" and enter your choice of DNS address.
Get
system information.
Chrome
OS is very minimal and consumer-facing, so it does not provide details such as
system memory, CPU usage, background processes, and similar metrics for the
end-user. However, if you want to reach those metrics, there are some hidden
commands that allow you to do this. Just enter chrome: // system / and enter in
the address bar. On this page, you will get all the information from hardware to
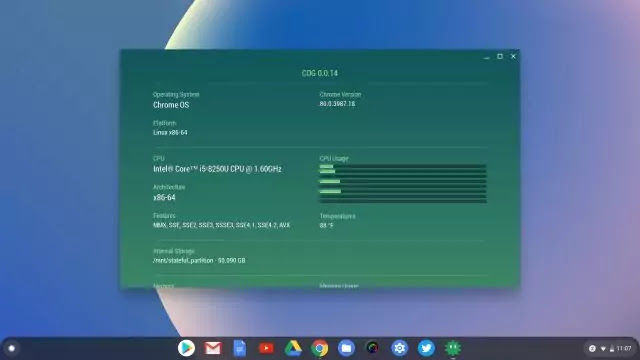
software. Apart from this, you can also install an extension called cog (free)
which allows you to monitor multiple matrices like CPU usage, temperature, etc.
in a sleek and graphical interface.
Network
File Share (Chromebook to Windows)
One
of the best features of Windows OS is that you can easily access files and
folders from other Windows computers using a normal wireless network. So to
make the desktop experience similar on Chrome OS, Google has also brought
network file share and embedded it in the native file manager. Basically, you
can remotely access all your Windows files and folders on your Chromebook
without any hassle.
Enable
Linux on a Chromebook.
Recently,
Google added support for Linux on Chrome OS and it is simply magical to use
both operating systems simultaneously. While the project is still in beta, the
terminal works quite well with support for all Linux commands. You can also
install Linux apps on Chrome OS, but let me be clear, at this point, the
performance is not as great. Anyway, if you want to enable it, open the
settings and just navigate to "Linux (beta)". Here, turn on the
toggle for Linux and go through the on-screen instructions. However, note that
both Chrome OS and Linux have different storage systems so you have to share
your local folders in Linux. You can do this from the original file manager.
Just right-click on the folder you want to share and choose "Select with
Linux".
Enable
ADB on Chrome OS (Android Debugging)
Prior
to this, there was an informal way to enable ADB on Chrome OS via Linux and
platform tools. However, things have changed now as Google brought native ADB
support to Chrome OS. You can find the dedicated page from Settings -> Linux
-> Develop Android App and enable the toggle for "Enable ADB
Debugging". You are ready
Chrome
Shell Learning (Krosch)
Similar
to the command prompt on Windows, Bash in Linux, and Terminal on macOS, Chrome
OS has its own command line called Chrome Shell (crossover). This allows you to
modify any system settings that are not otherwise available in the Settings or
Flag page. So, if you want to dive deeper into Chrome OS, you should learn what
Krosh offers and it can help you do many things.
Chrome OS Tips and Tricks
So,
before you use Chrome OS, you should know the detailed list of tips and tricks
that you should know. Over the years, Chrome OS has naturally improved leaps
and bounds, with many new features added. I made sure to include all of those
clean hacks so that you get the best Chrome OS experience. Anyway, all of that
belongs to us. If you want to know more about Chromebook and Chrome OS in
general then stay tuned. We are going to bring some cool stuff for you in the
coming days.
Stay tuned for eGyan for more tech content.
Stay tuned for eGyan for more tech content.




Post a Comment
Post a Comment
If You Have Any Doubts, Please Let Me Know